Automate Your Lead Pipeline: QuickLeadFinder + Zapier/Make Integration Guide
2025-12-24, 08:00:00
Manual lead management is the silent killer of sales productivity.
You scrape 1,000 leads from Google Maps. Then you spend 2 hours cleaning the data, formatting columns, removing duplicates, and importing to your CRM. By the time the leads are ready, they're already getting cold.
This guide shows you how to build automated workflows that take leads from QuickLeadFinder directly into your CRM, email verification service, and outreach tools—without touching a spreadsheet. (For foundational knowledge, see our Google Maps scraping guide.)
The Manual Lead Management Problem
Here's what a typical lead workflow looks like without automation:
QuickLeadFinder Search
        ↓
   Export CSV (5 min)
        ↓
   Open in Excel (2 min)
        ↓
   Clean data, format columns (15 min)
        ↓
   Upload to email verifier (5 min)
        ↓
   Wait for verification (30-60 min)
        ↓
   Download verified list (2 min)
        ↓
   Import to CRM (10 min)
        ↓
   Assign to sales reps (5 min)
        ↓
   Notify team (5 min)
        ↓
   FINALLY ready for outreach

Total time: 60-90 minutes per batch
Problems with this approach: - Time-consuming and error-prone - Delays between scraping and outreach - Inconsistent data formatting - No standardized process - Scales poorly as volume increases
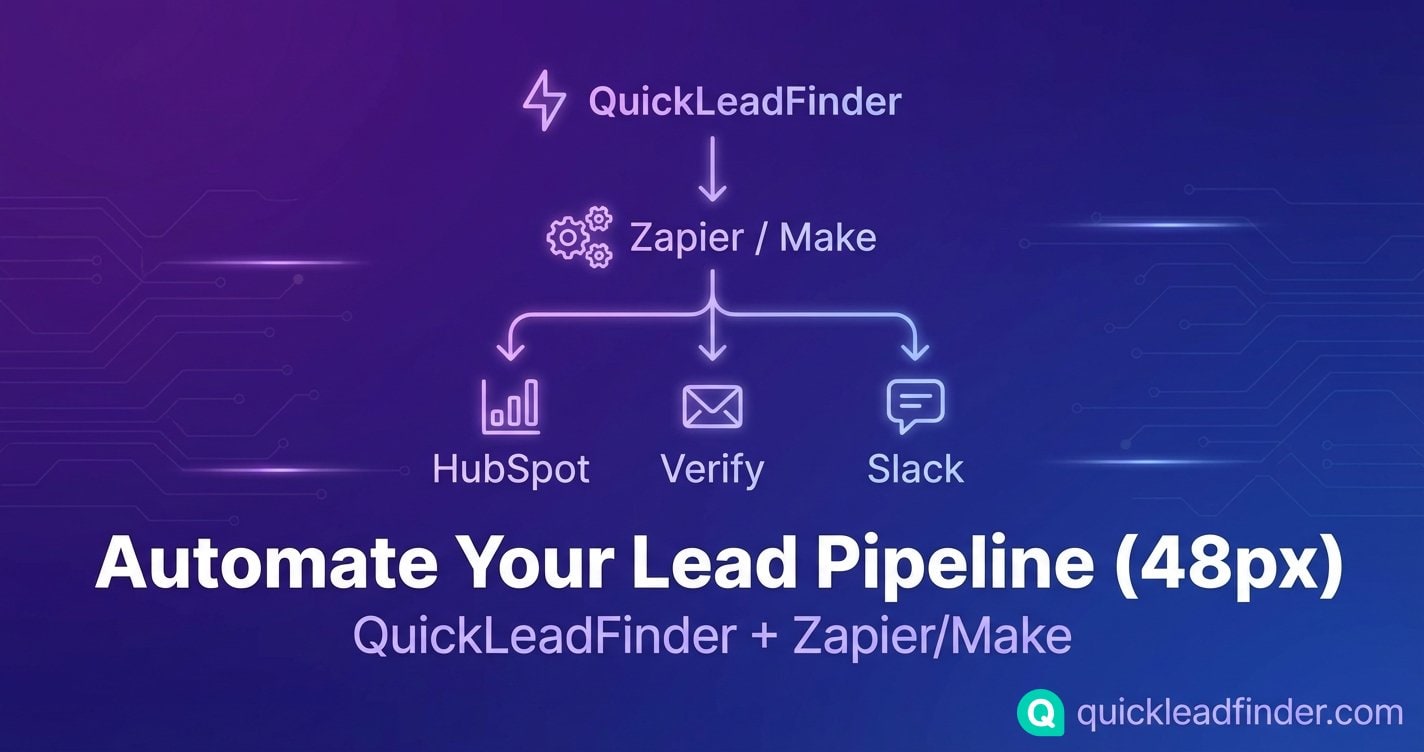
The Automated Solution
With proper automation, the same workflow becomes:
QuickLeadFinder Search
        ↓
   [AUTOMATIC] Webhook triggers
        ↓
   [AUTOMATIC] Email verification
        ↓
   [AUTOMATIC] CRM contact creation
        ↓
   [AUTOMATIC] Team notification
        ↓
   Ready for outreach

Total time: ~2 minutes (hands-off)
Benefits: - Zero manual data handling - Leads reach CRM within minutes - Consistent formatting every time - Scales infinitely - Team notified instantly
Part 1: Understanding the Integration Architecture
The Data Flow
┌─────────────────┐     ┌─────────────────┐     ┌─────────────────┐
│ QuickLeadFinder │────▶│  Automation     │────▶│    CRM/Tools    │
│   (Source)      │     │  (Zapier/Make)  │     │  (Destination)  │
└─────────────────┘     └─────────────────┘     └─────────────────┘
        │                       │                       │
   Export CSV/JSON         Transform &            Create records
   or Webhook              Route data             Send notifications
Integration Methods
| Method | Best For | Technical Level |
|---|---|---|
| CSV Import | Simple workflows, occasional use | Beginner |
| Zapier | Standard integrations, no-code | Beginner |
| Make (Integromat) | Complex workflows, conditional logic | Intermediate |
| API Direct | High volume, custom applications | Advanced |
Part 2: Zapier Integration Setup
Zapier is the easiest way to connect QuickLeadFinder to your existing tools.
Basic Workflow: QuickLeadFinder → HubSpot
What it does: Automatically creates HubSpot contacts from your QuickLeadFinder exports.
Step 1: Create a Zap
- Log into Zapier
- Click "Create Zap"
- Search for "Google Sheets" as the trigger (we'll use a shared sheet as the bridge)
Step 2: Set Up the Trigger - Trigger: "New Spreadsheet Row" - Connect your Google account - Select the spreadsheet where you'll paste QuickLeadFinder exports
Step 3: Set Up the Action - Action App: HubSpot - Action Event: "Create Contact" - Connect your HubSpot account
Step 4: Map the Fields
| QuickLeadFinder Field | HubSpot Field |
|---|---|
| Business Name | Company Name |
| Phone | Phone Number |
| Address | Street Address |
| City | City |
| Website | Website URL |
| Category | Industry (custom field) |
| Rating | Lead Score (custom field) |
| Review Count | Custom field |
Step 5: Test and Enable - Add a test row to your spreadsheet - Verify the contact appears in HubSpot - Turn on the Zap
Enhanced Workflow: With Email Verification
Add a verification step before CRM import to protect your sender reputation. (For complete data cleaning strategies, see our B2B Data Hygiene Guide.)
Workflow:
Google Sheets (new row)
        ↓
   Filter: Has email?
        ↓
   ZeroBounce: Validate email
        ↓
   Filter: Is valid?
        ↓
   HubSpot: Create contact
        ↓
   Slack: Notify team
Step-by-Step:
-
Trigger: New row in Google Sheets
-
Filter: Only continue if email field is not empty
- Field: Email
-
Condition: Is not empty
-
ZeroBounce Action: Validate Email
- Connect ZeroBounce account
-
Input: Email from spreadsheet
-
Filter: Only continue if email is valid
- Field: ZeroBounce status
-
Condition: Equals "valid"
-
HubSpot Action: Create Contact
- Map all fields as above
-
Add custom property: "Email Verified = Yes"
-
Slack Action: Send Channel Message
- Channel: #new-leads
- Message: "New verified lead: {{Business Name}} - {{Email}}"
Zapier Tips
Use Paths for Conditional Logic: Route leads differently based on criteria: - High rating (4.5+) → Priority queue - Low rating (<3.5) → Reputation management offer - No website → Web design offer
Use Delay for Rate Limiting: If your CRM has API limits, add a 1-minute delay between actions.
Use Formatter for Data Cleanup: - Capitalize business names - Format phone numbers consistently - Extract city from full address
Part 3: Make (Integromat) Advanced Workflows
Make offers more power and flexibility than Zapier, especially for complex scenarios.
The "Geo-Fence Campaign" Workflow
Use Case: Automatically assign leads to sales reps based on territory.
Scenario Overview:
┌─────────────┐     ┌─────────────┐     ┌─────────────┐
│  Webhook    │────▶│   Router    │────▶│  Territory  │
│  Trigger    │     │  (by city)  │     │  Assignment │
└─────────────┘     └─────────────┘     └─────────────┘
                          │
              ┌───────────┼───────────┐
              ▼           ▼           ▼
         ┌────────┐  ┌────────┐  ┌────────┐
         │ NYC    │  │ LA     │  │ Chicago│
         │ Rep: A │  │ Rep: B │  │ Rep: C │
         └────────┘  └────────┘  └────────┘
              │           │           │
              └───────────┼───────────┘
                          ▼
                   ┌─────────────┐
                   │  HubSpot    │
                   │  + Slack    │
                   └─────────────┘
Step-by-Step Setup:
- Create a Webhook Trigger
- Add a "Webhooks" module
- Select "Custom webhook"
-
Copy the webhook URL
-
Add a Router
- Add a "Router" module after the webhook
-
Create routes for each territory
-
Configure Route Filters
Route 1 (NYC):
City contains "New York" OR
   City contains "Brooklyn" OR
   City contains "Manhattan"
Route 2 (LA):
City contains "Los Angeles" OR
   City contains "Santa Monica" OR
   City contains "Beverly Hills"
- Set Variables for Each Route
- Add a "Set Variable" module on each route
- Variable:
assigned_rep - NYC: "[email protected]"
-
LA: "[email protected]"
-
Create CRM Contact
- Add HubSpot module after router merge
-
Map owner field to
assigned_repvariable -
Send Notifications
- Add Slack module
- Send DM to assigned rep
- Message: "New lead in your territory: {{Business Name}}"
The "Lead Scoring" Workflow
Use Case: Automatically score leads based on Google Maps data.
Scoring Logic:
| Signal | Points |
|---|---|
| Has website | +10 |
| Has email | +15 |
| Rating ≥ 4.5 | +20 |
| Rating < 3.5 | +10 (reputation need) |
| Reviews > 100 | +15 |
| Reviews < 10 | +5 (new business) |
| Has social links | +10 |
Make Scenario:
Webhook → Set Variables → Math (calculate score) → Router
                                                      │
                              ┌────────────────────────┼────────────────────────┐
                              ▼                        ▼                        ▼
                         Score ≥ 50              Score 30-49              Score < 30
                         (Hot Lead)              (Warm Lead)              (Cold Lead)
                              │                        │                        │
                              ▼                        ▼                        ▼
                         HubSpot                  HubSpot                  HubSpot
                         (Priority)              (Standard)               (Nurture)
                              │                        │                        │
                              ▼                        ▼                        ▼
                         Slack DM                Email alert             No alert
                         to closer               to SDR
Make vs. Zapier: When to Use Each
| Scenario | Recommendation |
|---|---|
| Simple A→B integration | Zapier |
| Multiple conditions/routes | Make |
| High volume (1000+ leads/day) | Make |
| Complex data transformation | Make |
| Team already uses Zapier | Zapier |
| Budget-conscious | Make (better pricing) |
Part 4: CRM-Specific Integration Guides
HubSpot Integration
Native Import Method:
- Export from QuickLeadFinder as CSV
- In HubSpot: Contacts → Import → File from computer
- Map columns to HubSpot properties
- Set import settings (create new, update existing)
Recommended Custom Properties:
| Property | Type | Purpose |
|---|---|---|
| Google Rating | Number | Lead qualification |
| Review Count | Number | Business maturity signal |
| Has Website | Checkbox | Service opportunity flag |
| Lead Source | Dropdown | "Google Maps Scrape" |
| Scrape Date | Date | Data freshness tracking |
Automation Ideas: - Create task when rating < 3.5 (reputation management opportunity) - Enroll in sequence when has email + no website - Notify owner when review count > 500 (established business)
Salesforce Integration
Data Loader Method:
- Export from QuickLeadFinder as CSV
- Open Salesforce Data Loader
- Select "Insert" for Leads or Contacts
- Map fields to Salesforce objects
Field Mapping:
| QuickLeadFinder | Salesforce Lead |
|---|---|
| Business Name | Company |
| Phone | Phone |
| Address | Street |
| City | City |
| Website | Website |
| Category | Industry |
Flow Automation: Create a Salesforce Flow to:
- Trigger on new Lead creation
- Check if Lead Source = "Google Maps"
- Auto-assign based on territory
- Create follow-up task
Pipedrive Integration
Direct Import:
- Export from QuickLeadFinder as CSV
- In Pipedrive: ... → Import data → From a spreadsheet
- Map columns to Pipedrive fields
- Choose to create Organizations and/or Persons
Custom Fields to Add: - Google Rating (number) - Review Count (number) - Scrape Source (text) - Data Date (date)
Workflow Automation: - Auto-create deal when lead has email + rating > 4.0 - Assign to rep based on city - Schedule activity for follow-up
Close CRM Integration
CSV Import:
- Export from QuickLeadFinder
- In Close: Settings → Import → Leads
- Map fields and import
Smart Views to Create: - "Hot Leads": Rating > 4.5 AND Has Email - "Reputation Opportunities": Rating < 3.5 - "Web Design Prospects": No Website
Part 5: Advanced Automation Patterns
Pattern 1: The "Drip Campaign Trigger"
Goal: Automatically enroll new leads in email sequences based on their profile. (For email sequence templates, see our Cold Email Playbook.)
New Lead Created
       ↓
   Check: Has email?
       ↓
   Check: Industry type
       ↓
   ┌─────────────────────────────────────┐
   │  Restaurant → Restaurant sequence   │
   │  Contractor → Contractor sequence   │
   │  Medical → Medical sequence         │
   │  Other → General sequence           │
   └─────────────────────────────────────┘
       ↓
   Enroll in appropriate sequence
Pattern 2: The "Competitive Intel Alert"
Goal: Get notified when scraping reveals interesting competitive data.
New Lead Batch Imported
       ↓
   Aggregate: Count by rating
       ↓
   Filter: Any rating < 3.0?
       ↓
   Yes → Slack alert: "Found X low-rated competitors"
       ↓
   Create report with list
Pattern 3: The "Data Enrichment Pipeline"
Goal: Enhance QuickLeadFinder data with additional sources.
New Lead
   ↓
QuickLeadFinder data (name, phone, website, rating)
   ↓
Clearbit: Enrich with company size, revenue
   ↓
Hunter.io: Find additional email contacts
   ↓
LinkedIn: Match company page
   ↓
CRM: Create enriched contact record
Pattern 4: The "Territory Balancing System"
Goal: Distribute leads evenly across sales team.
New Lead
   ↓
Check: Which rep has fewest leads this week?
   ↓
Assign to that rep
   ↓
Update counter
   ↓
Notify rep
Part 6: Troubleshooting Common Issues
Issue: Duplicate Contacts
Cause: Same business scraped multiple times or already exists in CRM.
Solution:
- In Zapier/Make: Add a "Find Contact" step before creating
- If found, update instead of create
- Use business name + city as unique identifier
Issue: Malformed Data
Cause: Special characters, inconsistent formatting in source data.
Solution:
- Add Formatter step to clean data
- Use regex to extract/clean phone numbers
- Standardize city names (e.g., "NYC" → "New York")
Issue: Rate Limiting
Cause: Too many API calls to CRM or verification service.
Solution:
- Add delays between actions (30-60 seconds)
- Batch imports instead of real-time
- Upgrade API tier if volume justifies
Issue: Missing Required Fields
Cause: CRM requires fields that QuickLeadFinder doesn't provide.
Solution:
- Set default values for required fields
- Use conditional logic to skip incomplete records
- Create "needs review" queue for manual completion
Part 7: Measuring Automation ROI
Time Savings Calculator
| Task | Manual Time | Automated Time | Savings |
|---|---|---|---|
| Export & format | 20 min | 0 min | 20 min |
| Email verification | 45 min | 2 min | 43 min |
| CRM import | 15 min | 0 min | 15 min |
| Team notification | 5 min | 0 min | 5 min |
| Total per batch | 85 min | 2 min | 83 min |
Monthly impact (20 batches): - Manual: 28 hours - Automated: 40 minutes - Time saved: 27+ hours/month
Cost-Benefit Analysis
Automation costs: - Zapier Pro: $49/month - ZeroBounce: ~$50/month (for 5,000 verifications) - Total: ~$100/month
Value of time saved: - 27 hours × $50/hour = $1,350/month
ROI: 1,250%
Getting Started Checklist
Week 1: Foundation
- [ ] Sign up for QuickLeadFinder
- [ ] Choose automation platform (Zapier or Make)
- [ ] Connect CRM to automation platform
- [ ] Create bridge spreadsheet (if using CSV method)
Week 2: Basic Automation
- [ ] Build simple import workflow
- [ ] Add email verification step
- [ ] Test with 50 leads
- [ ] Verify CRM records are correct
Week 3: Enhancement
- [ ] Add team notifications
- [ ] Implement lead scoring
- [ ] Create territory routing (if applicable)
- [ ] Build reporting dashboard
Week 4: Optimization
- [ ] Analyze workflow performance
- [ ] Fix any data quality issues
- [ ] Add conditional logic for lead segmentation
- [ ] Document process for team
Stop Wasting Time on Manual Data Entry
Every hour spent on manual lead management is an hour not spent closing deals.
QuickLeadFinder + automation tools give you:
- ✅ Leads in your CRM within minutes of scraping
- ✅ Verified emails protecting your sender reputation
- ✅ Automatic territory assignment
- ✅ Instant team notifications
- ✅ Consistent data quality
Build your automation pipeline once, benefit forever.
👉 Start your free trial with QuickLeadFinder and connect it to your CRM today.
Related Resources
Complete your lead generation system with these guides:
- The Ultimate Google Maps Scraping Guide — Master the fundamentals of Maps data extraction
- Cold Email Playbook — Turn your CRM leads into closed deals
- B2B Data Hygiene Guide — Clean your data before importing to CRM
- How to Find Business Emails — Maximize email discovery rates
Browse all automation guides in the QuickLeadFinder Blog.